> ## Documentation Index
> Fetch the complete documentation index at: https://docs.siliconflow.cn/llms.txt
> Use this file to discover all available pages before exploring further.
# Trae
> Updated: March 11, 2025
[Trae](https://www.trae.com.cn/) is ByteDance's first AI IDE. Trae comes with a set of high-performing industry models that you can switch between seamlessly. Additionally, Trae Chat mode supports integrating SiliconFlow model resources via API Key, allowing for more personalized usage.
## Switching Models
At the bottom right of the input box, click on the current model name to open the model list, then select the model you want to use.
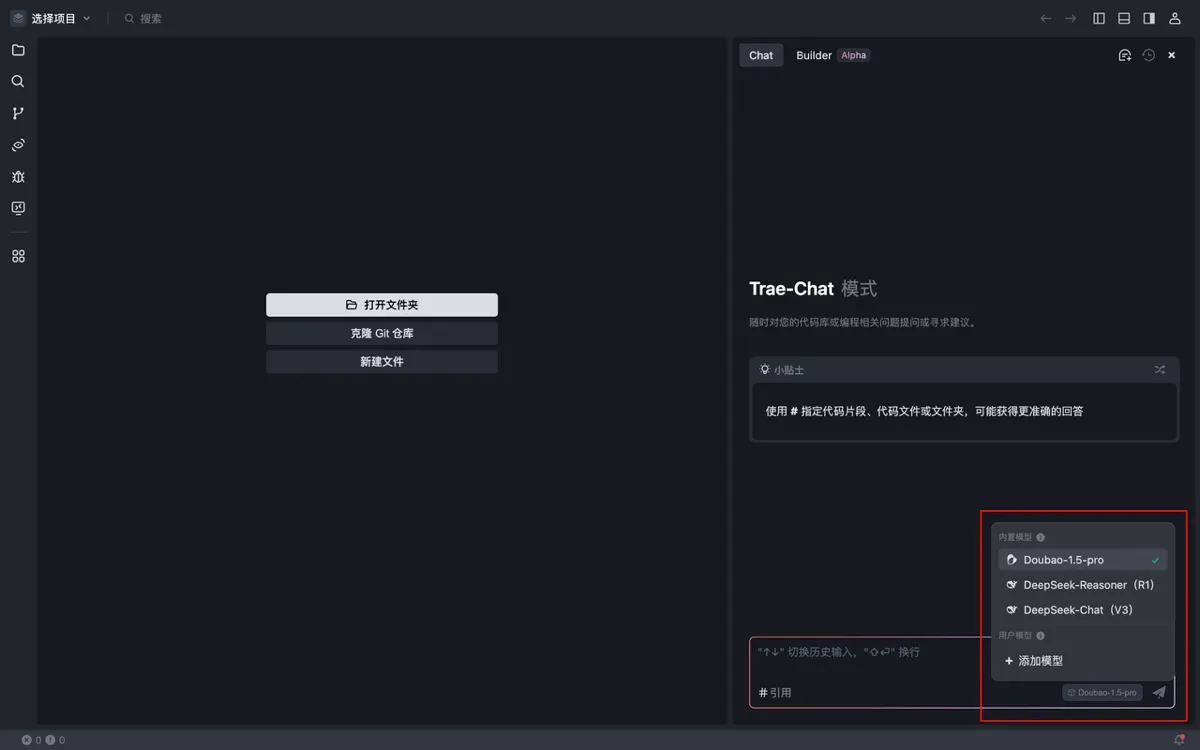 Each model has different capabilities. You can hover over the model name to view its supported features.
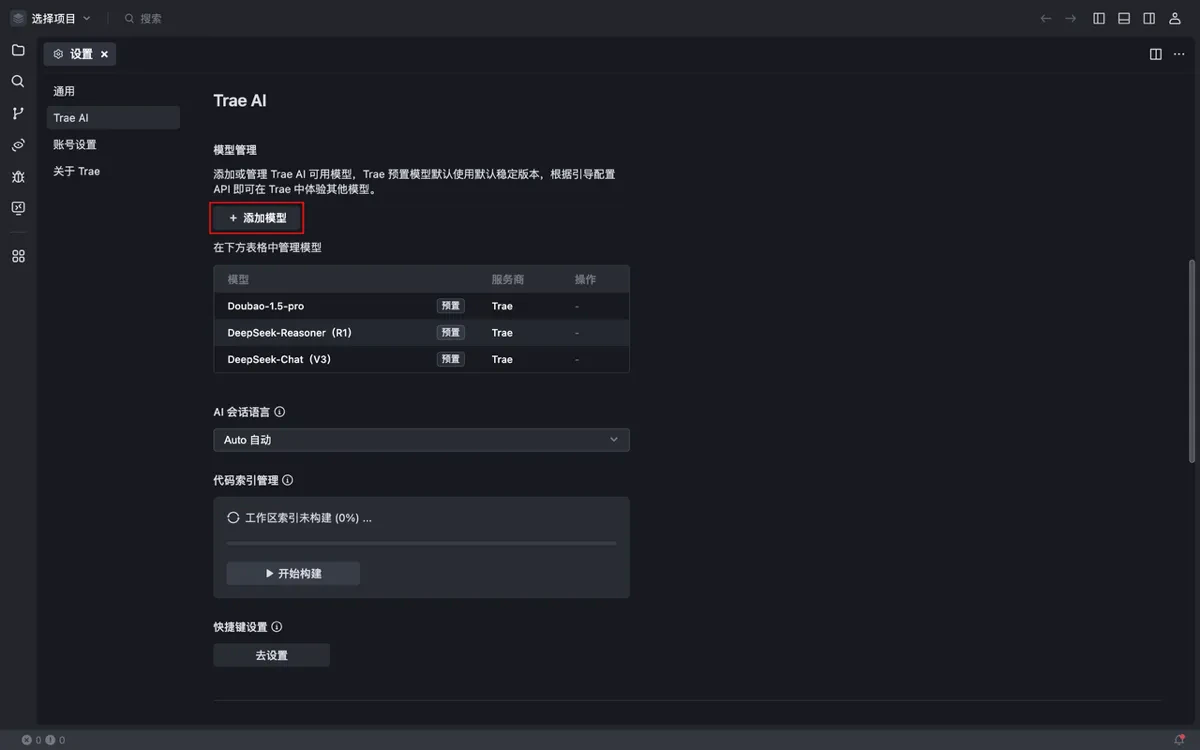
## Adding a SiliconFlow Model
1、Go to **Profile** > **Settings** > **Trae AI** > **Model Management**.
2、Click the **Add Model** button.
Each model has different capabilities. You can hover over the model name to view its supported features.
## Adding a SiliconFlow Model
1、Go to **Profile** > **Settings** > **Trae AI** > **Model Management**.
2、Click the **Add Model** button.
 This will open the **Add Model** window.
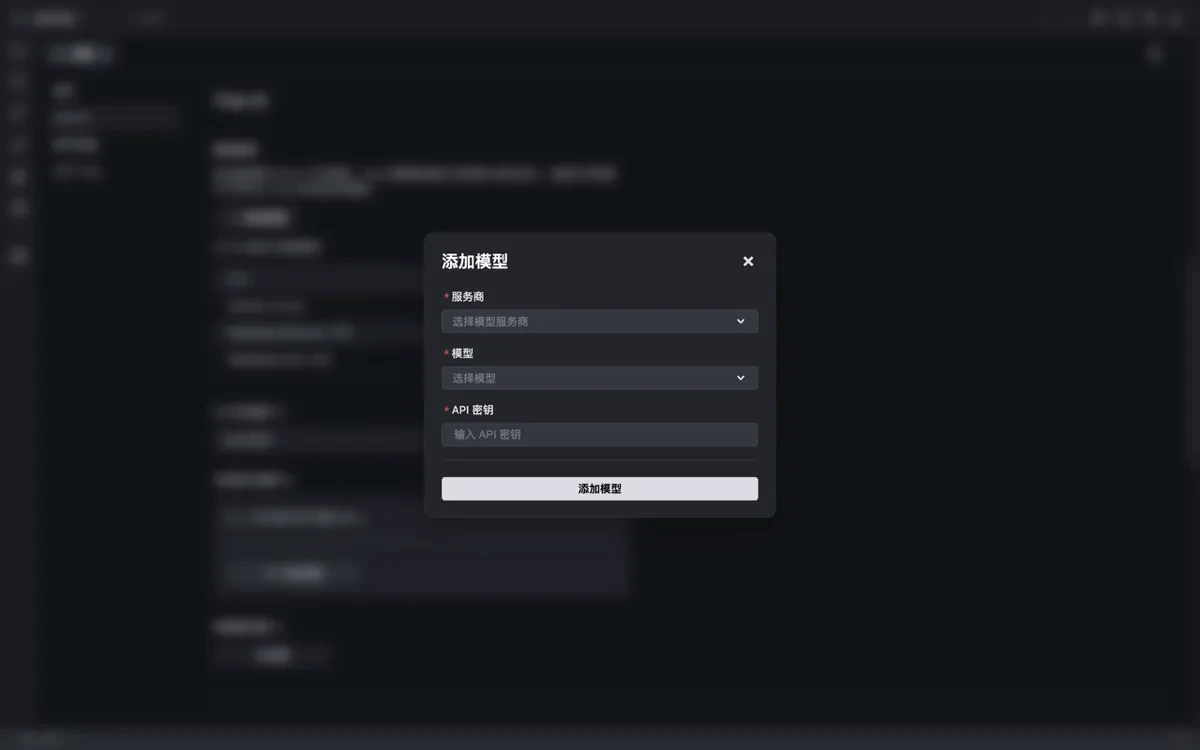 3、Select **SiliconFlow** as the provider.
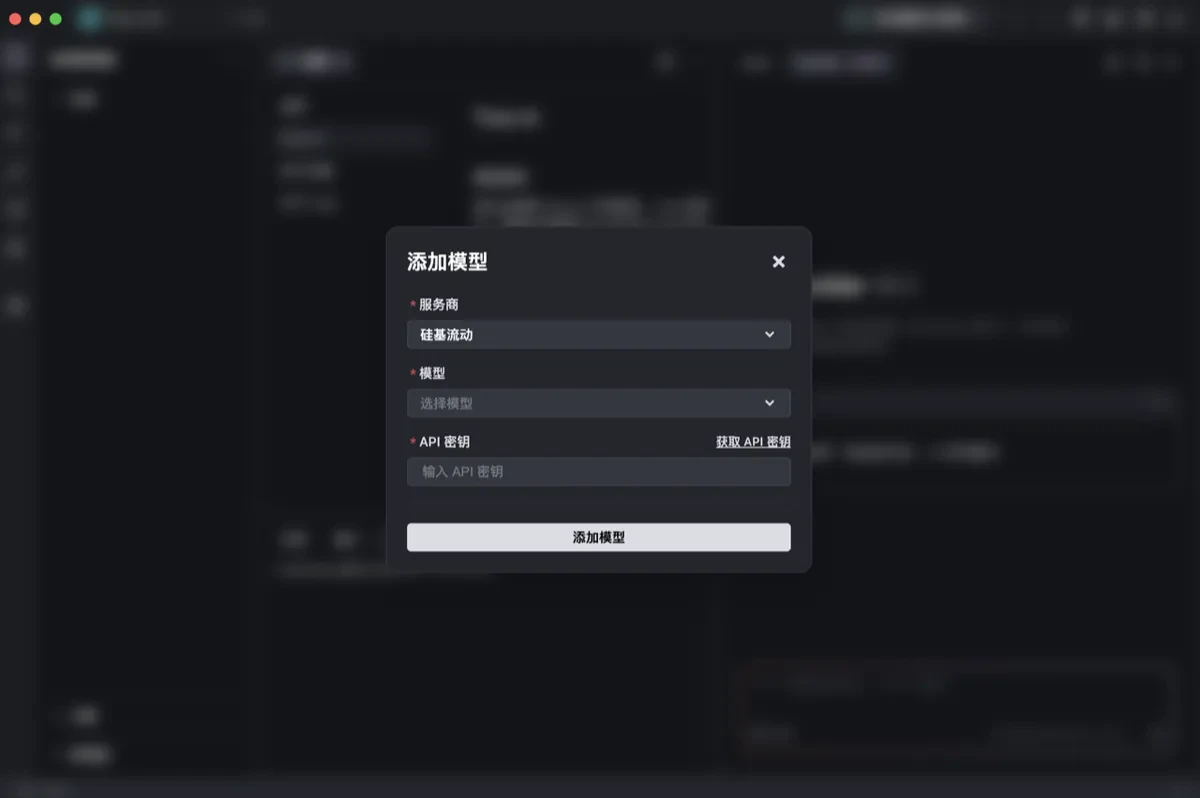 4、Choose a **Model**:
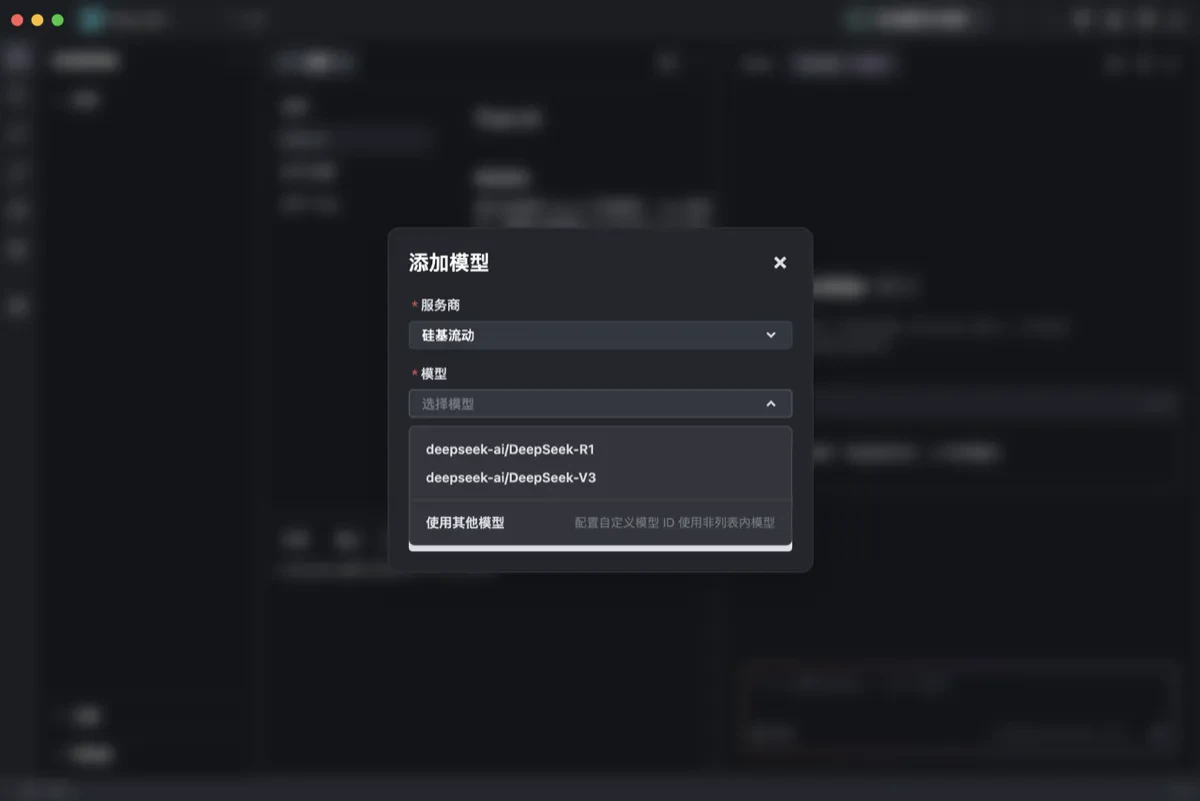 ○ Select a pre-configured model from the list (all are default versions).
○ If you wish to use a different model or a specific model version, click **Use Other Model** and enter the model ID in the input field.
5、Enter the **API Key**.
Click the **Get API Key** button, and Trae will open the SiliconFlow API key configuration page. (If you haven't registered/logged in, complete that step first.)
On the page, create a new API Key and copy it.
6、Click the **Add Model** button.
Trae will call the provider’s API to verify the validity of the API Key. The possible outcomes are:
○ If the connection is successful, the custom model will be added.
○ If the connection fails, the **Add Model** window will display an error message along with the provider's error logs, which you can use to troubleshoot the issue.
## Managing Custom Models
You can manage custom models in the Settings Center.
○ Select a pre-configured model from the list (all are default versions).
○ If you wish to use a different model or a specific model version, click **Use Other Model** and enter the model ID in the input field.
5、Enter the **API Key**.
Click the **Get API Key** button, and Trae will open the SiliconFlow API key configuration page. (If you haven't registered/logged in, complete that step first.)
On the page, create a new API Key and copy it.
6、Click the **Add Model** button.
Trae will call the provider’s API to verify the validity of the API Key. The possible outcomes are:
○ If the connection is successful, the custom model will be added.
○ If the connection fails, the **Add Model** window will display an error message along with the provider's error logs, which you can use to troubleshoot the issue.
## Managing Custom Models
You can manage custom models in the Settings Center.
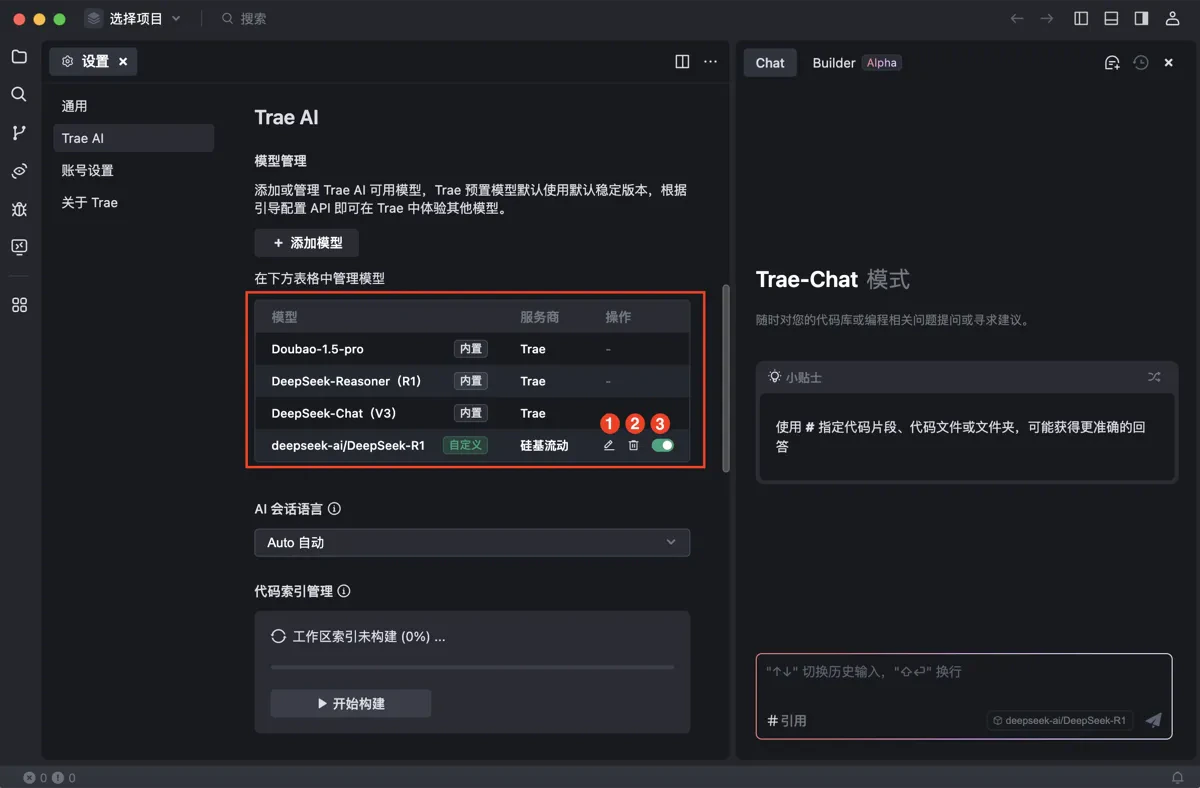 | **No.** | **Action** | **Description** |
| ------- | -------------------- | ------------------------------------------------------------------------------------------------------------------------------------------------------------------------------------------------ |
| 1 | Edit Model | Click the **Edit** icon to modify the provider, model name, API key, etc. |
| 2 | Delete Model | Click the **Delete** icon and confirm the action. Once deleted, the model will be removed from the list and cannot be used. |
| 3 | Enable/Disable Model | If you don't want to delete a model but don't need it for a while, you can disable it. Disabled models will remain in the settings list but will not appear in the AI chat model selection list. |
| **No.** | **Action** | **Description** |
| ------- | -------------------- | ------------------------------------------------------------------------------------------------------------------------------------------------------------------------------------------------ |
| 1 | Edit Model | Click the **Edit** icon to modify the provider, model name, API key, etc. |
| 2 | Delete Model | Click the **Delete** icon and confirm the action. Once deleted, the model will be removed from the list and cannot be used. |
| 3 | Enable/Disable Model | If you don't want to delete a model but don't need it for a while, you can disable it. Disabled models will remain in the settings list but will not appear in the AI chat model selection list. |