> ## Documentation Index
> Fetch the complete documentation index at: https://docs.siliconflow.cn/llms.txt
> Use this file to discover all available pages before exploring further.
# LangBot
> Updated: July 16, 2025
## About LangBot
[**LangBot**](https://langbot.app) is an open-source instant messaging bot platform that supports integration with **Feishu, DingTalk, QQ, WeChat, Discord, Telegram**, and various other messaging platforms. It helps users handle tasks or act as part of a business workflow directly within these platforms.
 In combination with the [**SiliconFlow**](https://siliconflow.cn/zh-cn/siliconcloud) large model API service, LangBot can integrate with various mainstream open-source large language models. Users can select the most appropriate model based on their specific scenario needs. The following is a complete configuration tutorial — just a few simple steps to get your own intelligent assistant.
## Configuration Tutorial
### Step 1: Obtain a SiliconFlow API Key
#### How to Get an API Key
1. Register and log in to [SiliconFlow](https://cloud.siliconflow.cn/).
2. Navigate to the `API Key` page and generate a new API key.
#### Retrieve Model Information
Visit the `Model Marketplace` to view available models and detailed parameters.
### Step 2: Deploy and Configure LangBot
#### Deploy LangBot Using Docker
> For more deployment methods, refer to the [documentation](https://docs.langbot.app/zh/insight/guide.html)
Make sure Git and Docker are installed.
```bash theme={null}
git clone https://github.com/langbot-app/LangBot
cd LangBot
docker compose up -d
```
> If you are using it in mainland China, you can replace the image in `docker-compose.yaml` with:
```
docker.langbot.app/langbot-public/rockchin/langbot:latest
```
#### Access the WebUI
After starting, visit:
```
http://127.0.0.1:5300
```
The first run will prompt you to create a configuration file. Follow the instructions to complete initialization.
#### Configure the Chat Model
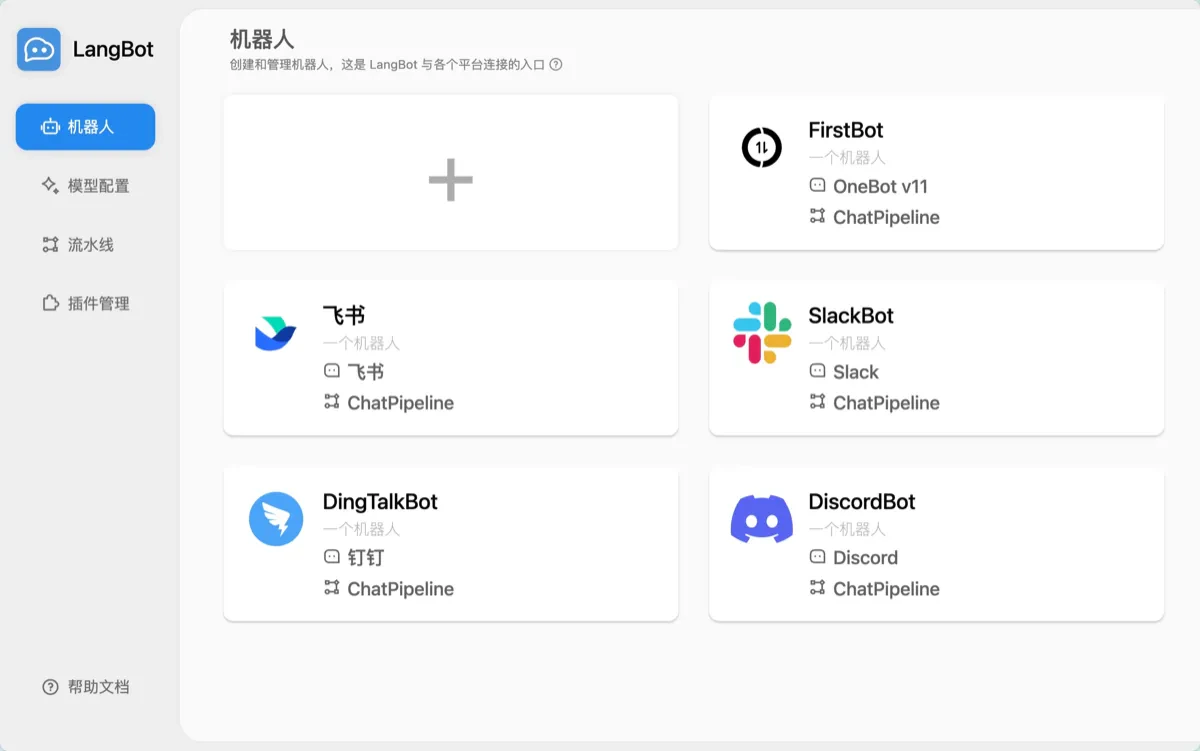
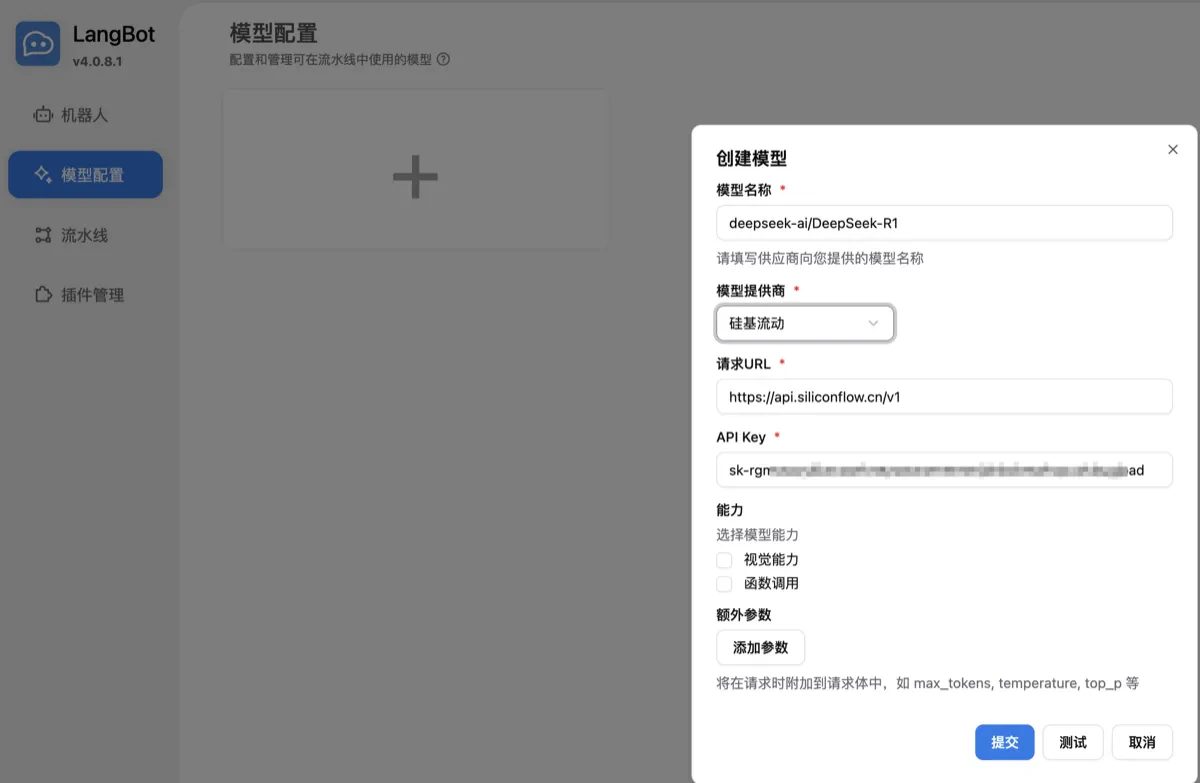
1. Log in to the WebUI and navigate to the **Model Configuration** page.
2. Add a new model and fill in the following information:
| Field | Description |
| ------------ | ---------------------------------------------------------------------------- |
| Model Name | Choose the desired model name (available on SiliconFlow's Model Marketplace) |
| Provider | Select `SiliconFlow` |
| API Key | Use the key from the `API Key` page on SiliconFlow |
| Capabilities | Select the appropriate capabilities based on the model description |
In combination with the [**SiliconFlow**](https://siliconflow.cn/zh-cn/siliconcloud) large model API service, LangBot can integrate with various mainstream open-source large language models. Users can select the most appropriate model based on their specific scenario needs. The following is a complete configuration tutorial — just a few simple steps to get your own intelligent assistant.
## Configuration Tutorial
### Step 1: Obtain a SiliconFlow API Key
#### How to Get an API Key
1. Register and log in to [SiliconFlow](https://cloud.siliconflow.cn/).
2. Navigate to the `API Key` page and generate a new API key.
#### Retrieve Model Information
Visit the `Model Marketplace` to view available models and detailed parameters.
### Step 2: Deploy and Configure LangBot
#### Deploy LangBot Using Docker
> For more deployment methods, refer to the [documentation](https://docs.langbot.app/zh/insight/guide.html)
Make sure Git and Docker are installed.
```bash theme={null}
git clone https://github.com/langbot-app/LangBot
cd LangBot
docker compose up -d
```
> If you are using it in mainland China, you can replace the image in `docker-compose.yaml` with:
```
docker.langbot.app/langbot-public/rockchin/langbot:latest
```
#### Access the WebUI
After starting, visit:
```
http://127.0.0.1:5300
```
The first run will prompt you to create a configuration file. Follow the instructions to complete initialization.
#### Configure the Chat Model
1. Log in to the WebUI and navigate to the **Model Configuration** page.
2. Add a new model and fill in the following information:
| Field | Description |
| ------------ | ---------------------------------------------------------------------------- |
| Model Name | Choose the desired model name (available on SiliconFlow's Model Marketplace) |
| Provider | Select `SiliconFlow` |
| API Key | Use the key from the `API Key` page on SiliconFlow |
| Capabilities | Select the appropriate capabilities based on the model description |
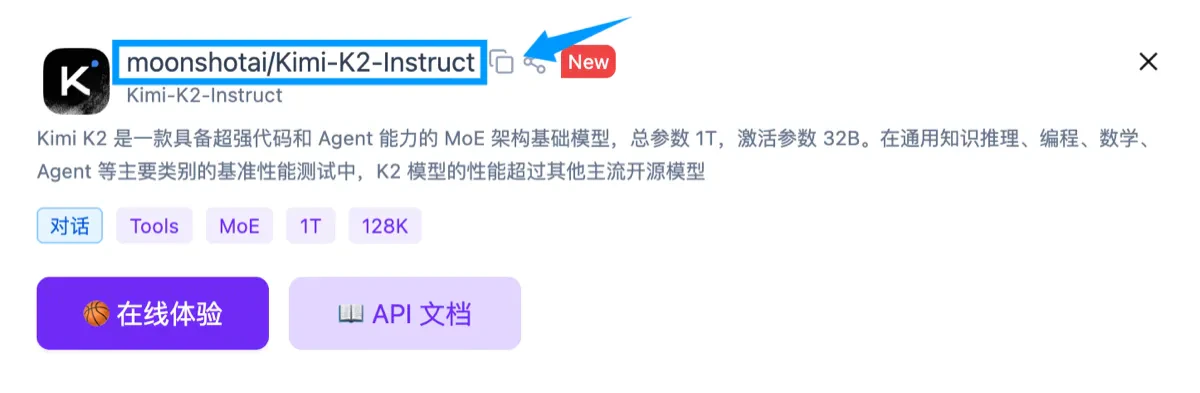 You can find the model name in the title of the model details page on SiliconFlow.
 ***
### Step 3: Connect to a Platform (Using DingTalk as an Example)
> For more platforms like WeCom, Feishu, Discord, Telegram, QQ, WeChat, etc., refer to the [LangBot Documentation](https://docs.langbot.app/zh/insight/guide.html)
#### Create a DingTalk Bot App
1. Log in to the [DingTalk Developer Console](https://open-dev.dingtalk.com/)
***
### Step 3: Connect to a Platform (Using DingTalk as an Example)
> For more platforms like WeCom, Feishu, Discord, Telegram, QQ, WeChat, etc., refer to the [LangBot Documentation](https://docs.langbot.app/zh/insight/guide.html)
#### Create a DingTalk Bot App
1. Log in to the [DingTalk Developer Console](https://open-dev.dingtalk.com/)
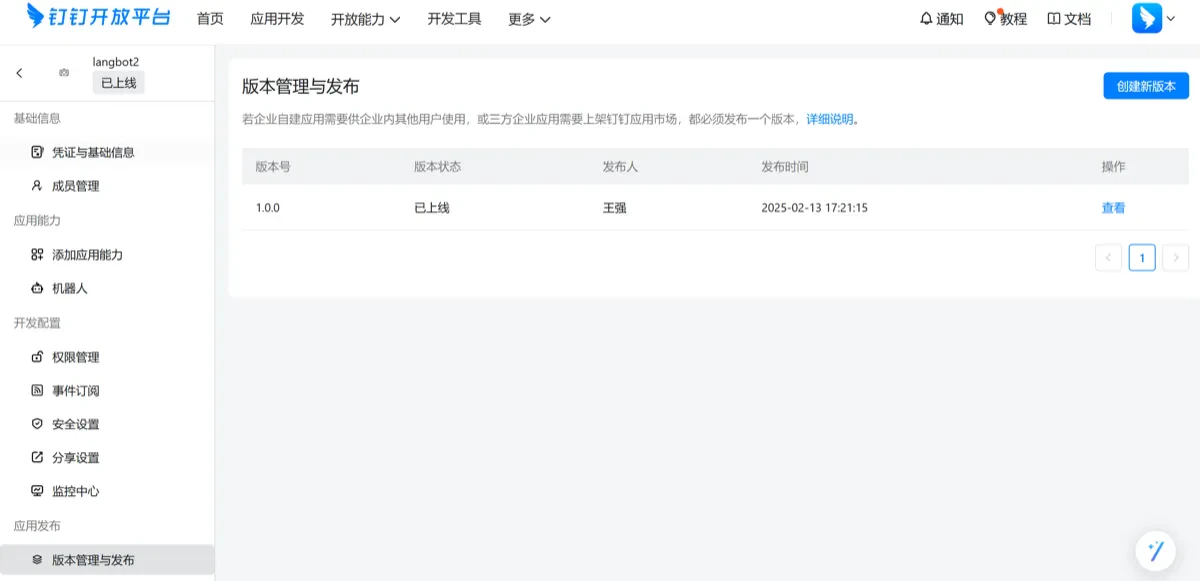
 2. Enter your organization, click **App Development** → **Create App**, and fill in the basic information.
3. Add the **Bot** capability, complete the basic settings, and publish the app.
2. Enter your organization, click **App Development** → **Create App**, and fill in the basic information.
3. Add the **Bot** capability, complete the basic settings, and publish the app.
 #### Configure the Bot
* Under the **Bot** tab, fill in the relevant information and publish.
#### Configure the Bot
* Under the **Bot** tab, fill in the relevant information and publish.
 * In **Version Management**, configure the version number.
 * In **Event Subscriptions**, choose **Stream Mode** (no public callback URL needed).
* In **Credentials & Basic Info**, note the following:
* Client ID
* Client Secret
* RobotCode
* Bot Name
#### Bind in the LangBot Platform
1. Open the LangBot WebUI and edit the bot.
* In **Event Subscriptions**, choose **Stream Mode** (no public callback URL needed).
* In **Credentials & Basic Info**, note the following:
* Client ID
* Client Secret
* RobotCode
* Bot Name
#### Bind in the LangBot Platform
1. Open the LangBot WebUI and edit the bot.
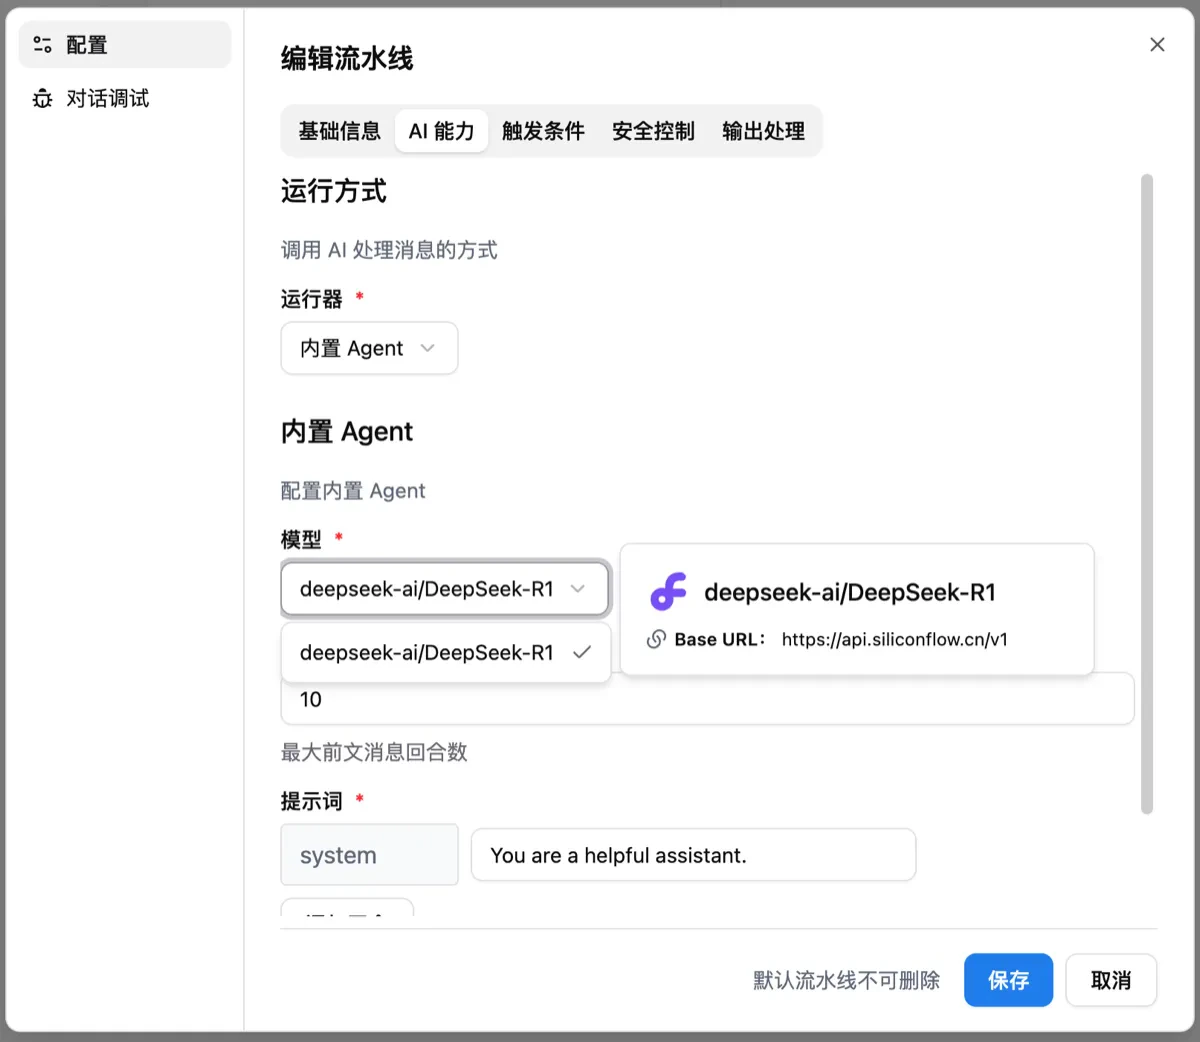
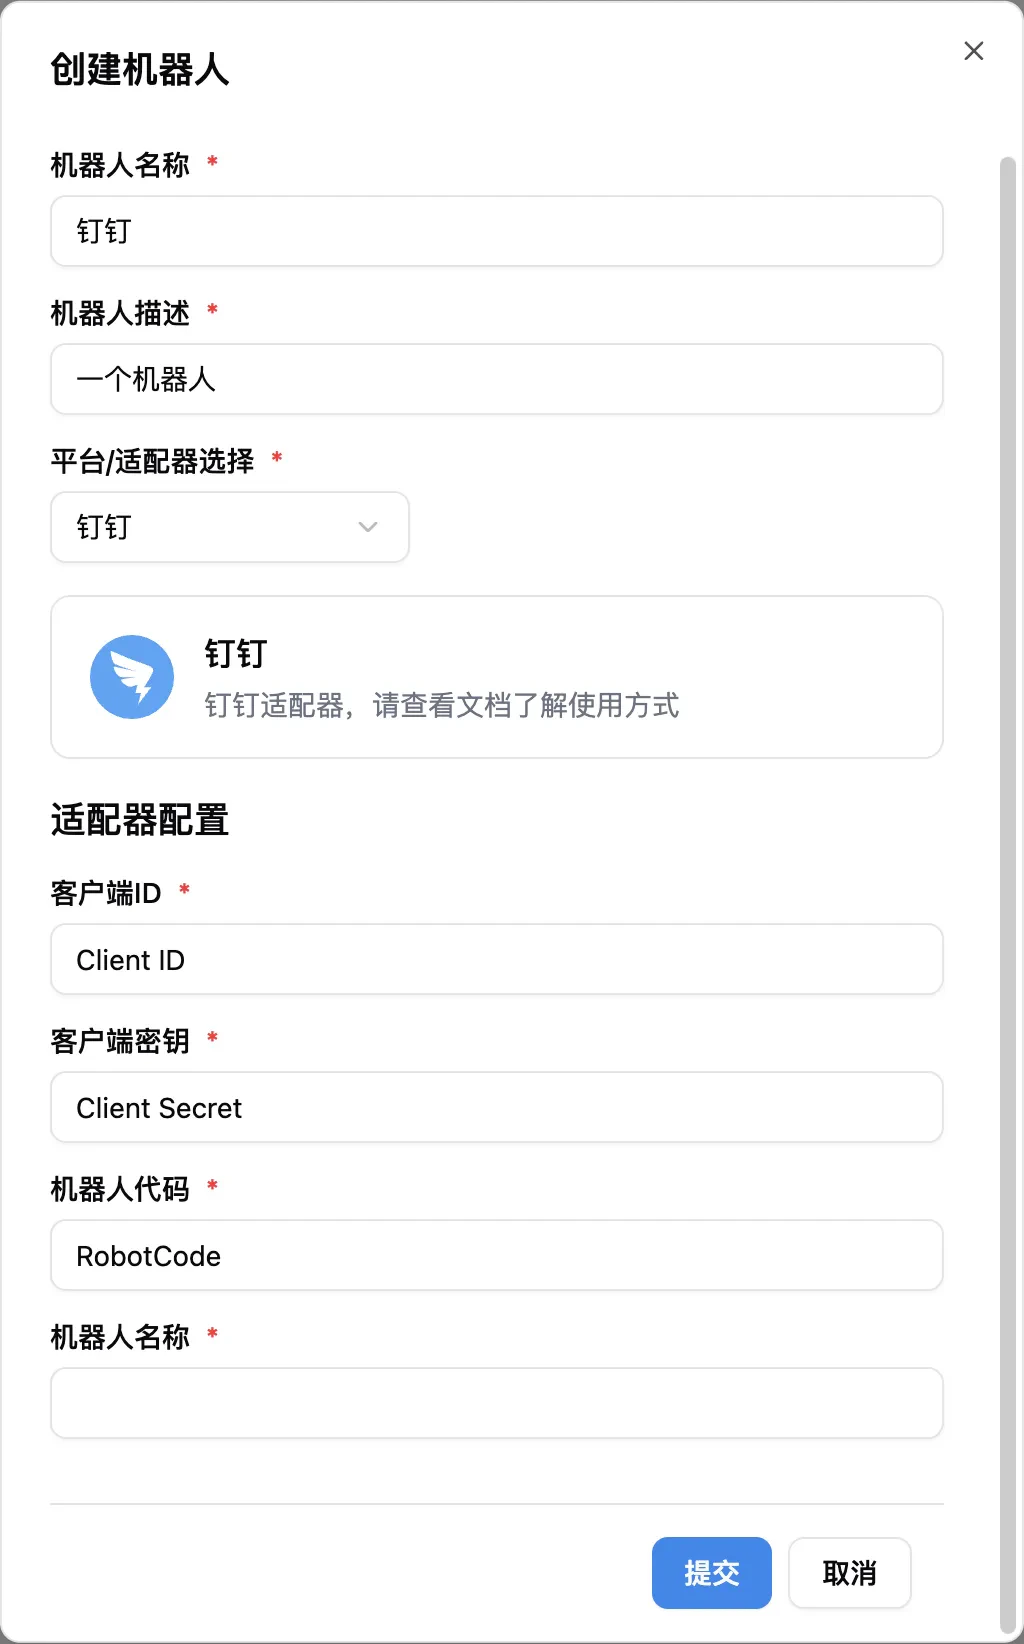 2. Bind a pipeline (by default, `ChatPipeline` is available). Select **DingTalk** as the platform.
3. Edit the pipeline, choose **Built-in Agent** under AI capabilities, and select the previously configured model.
2. Bind a pipeline (by default, `ChatPipeline` is available). Select **DingTalk** as the platform.
3. Edit the pipeline, choose **Built-in Agent** under AI capabilities, and select the previously configured model.
 ***
### Step 4: Use the Bot
1. In DingTalk, search for the bot name and click to start chatting.
2. To use the bot in a group chat, go to the group settings, click **Add Bot**, and search for the bot name to add it.
***
### Step 4: Use the Bot
1. In DingTalk, search for the bot name and click to start chatting.
2. To use the bot in a group chat, go to the group settings, click **Add Bot**, and search for the bot name to add it.