> ## Documentation Index
> Fetch the complete documentation index at: https://docs.siliconflow.cn/llms.txt
> Use this file to discover all available pages before exploring further.
# CC Switch
> Last updated: April 15, 2026
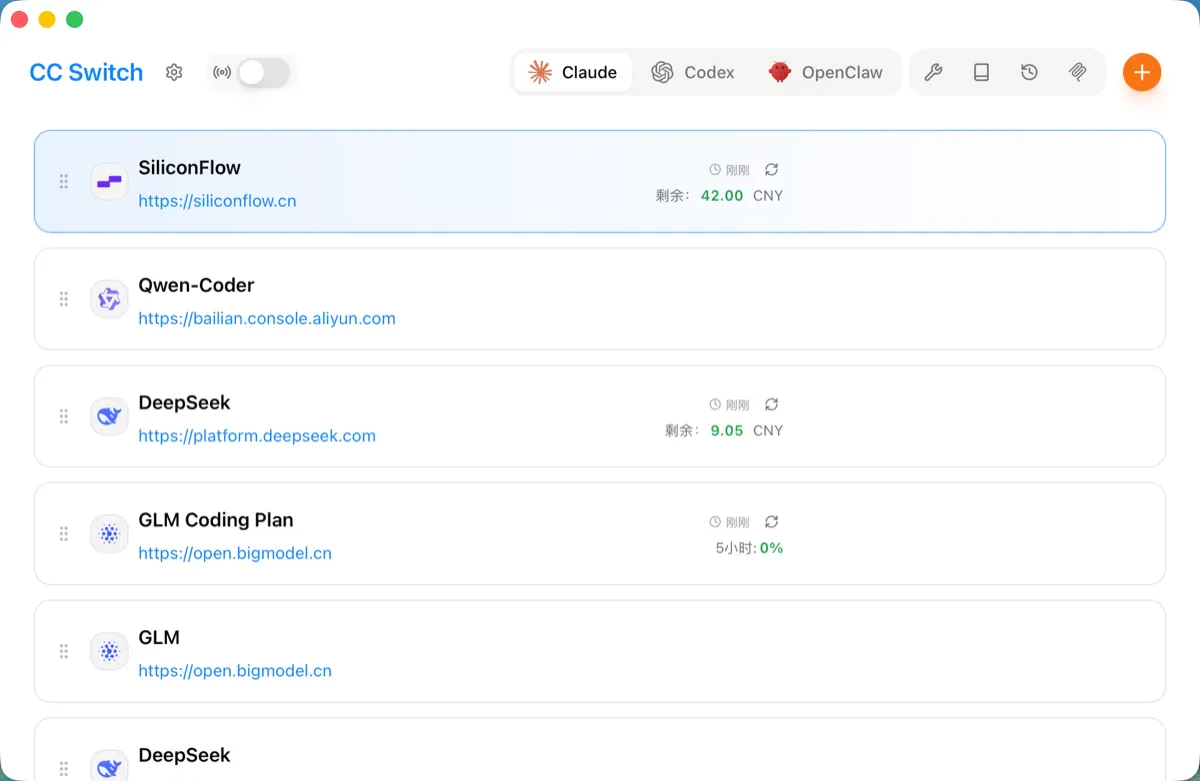
[CC Switch](https://github.com/farion1231/cc-switch) is a cross-platform desktop application (Windows / macOS / Linux) for centrally managing provider configurations for five major AI programming CLI tools: Claude Code, Codex, Gemini CLI, OpenCode, and OpenClaw.
If you are using these CLI tools, you have probably experienced the hassle of manually editing configuration files such as `settings.json`, `auth.json`, and `.env`. CC Switch comes with 50+ built-in provider presets (including SiliconFlow). After selecting a preset, you only need to fill in the API Key, and the switch takes effect with one click.
> **💡 Tip**: CC Switch is an open-source project. If it helps you, you can visit the [GitHub repository](https://github.com/farion1231/cc-switch) and click ⭐️ Star to support the project.
### Core Features
* **Provider management and one-click switching** — 50+ built-in presets, switch in seconds from the main interface or system tray
* **Unified MCP management** — Manage MCP server configurations across 4 applications, edit once and sync everywhere
* **Prompt management** — Markdown editor, sync to CLAUDE.md / AGENTS.md / GEMINI.md
* **Skill management** — Browse GitHub repositories, install skill extensions with one click, built-in skills.sh
* **Usage statistics** — Token consumption tracking, cost monitoring, trend charts
* **Local routing + failover** — Automatic failover, circuit breaker, request smoothing
* **Session management** — Browse and search conversation history across applications
* **Cloud sync** — Sync configurations across multiple devices via WebDAV
 ## 1. Download and Install
Visit [GitHub Releases](https://github.com/farion1231/cc-switch/releases) to download the latest version.
#### macOS
**Method 1: Homebrew (recommended)**
```bash theme={null}
brew tap farion1231/ccswitch
brew install --cask cc-switch
```
**Method 2: Manual installation**
Download `CC-Switch-v{version}-macOS.dmg` (recommended), double-click to open it, then drag `CC Switch.app` into the Applications folder. You can also download `CC-Switch-v{version}-macOS.zip` and use it directly after extraction.
#### Windows
**Method 1: MSI installer**
Download `CC-Switch-v{version}-Windows.msi` and double-click to run the installer.
**Method 2: Portable version (no installation required)**
Download `CC-Switch-v{version}-Windows-Portable.zip`, extract it, and run `CC-Switch.exe` directly.
#### Linux
**ArchLinux**
```bash theme={null}
paru -S cc-switch-bin
```
**Debian / Ubuntu**
```bash theme={null}
sudo dpkg -i CC-Switch-v{version}-Linux.deb
```
**AppImage (universal)**
```bash theme={null}
chmod +x CC-Switch-v{version}-Linux.AppImage
./CC-Switch-v{version}-Linux.AppImage
```
## 2. Configure SiliconFlow
### 2.1 Get a SiliconFlow API Key
1. Open the [SiliconFlow platform](https://cloud.siliconflow.cn/i/drGuwc9k), register, and log in to your account
2. Complete real-name verification
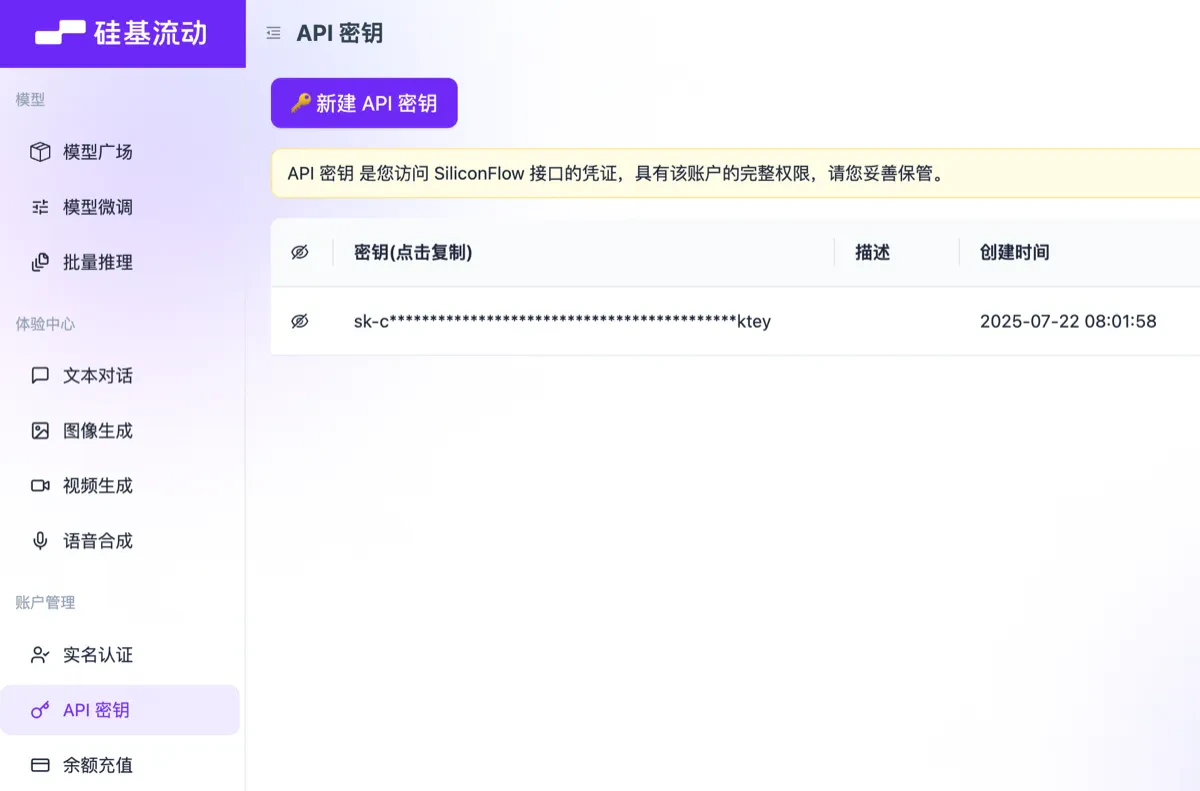
3. Go to the **API Key** management page
4. Click "Create New API Key", then copy and save it properly
## 1. Download and Install
Visit [GitHub Releases](https://github.com/farion1231/cc-switch/releases) to download the latest version.
#### macOS
**Method 1: Homebrew (recommended)**
```bash theme={null}
brew tap farion1231/ccswitch
brew install --cask cc-switch
```
**Method 2: Manual installation**
Download `CC-Switch-v{version}-macOS.dmg` (recommended), double-click to open it, then drag `CC Switch.app` into the Applications folder. You can also download `CC-Switch-v{version}-macOS.zip` and use it directly after extraction.
#### Windows
**Method 1: MSI installer**
Download `CC-Switch-v{version}-Windows.msi` and double-click to run the installer.
**Method 2: Portable version (no installation required)**
Download `CC-Switch-v{version}-Windows-Portable.zip`, extract it, and run `CC-Switch.exe` directly.
#### Linux
**ArchLinux**
```bash theme={null}
paru -S cc-switch-bin
```
**Debian / Ubuntu**
```bash theme={null}
sudo dpkg -i CC-Switch-v{version}-Linux.deb
```
**AppImage (universal)**
```bash theme={null}
chmod +x CC-Switch-v{version}-Linux.AppImage
./CC-Switch-v{version}-Linux.AppImage
```
## 2. Configure SiliconFlow
### 2.1 Get a SiliconFlow API Key
1. Open the [SiliconFlow platform](https://cloud.siliconflow.cn/i/drGuwc9k), register, and log in to your account
2. Complete real-name verification
3. Go to the **API Key** management page
4. Click "Create New API Key", then copy and save it properly
 > **💡 Tip**: By registering through the link above and completing real-name verification, you can receive a 16 RMB reward, which can be used across models on the platform.
### 2.2 Add the SiliconFlow Provider (Claude Code)
Open CC Switch and follow the steps below to add the provider:
#### 2.2.1 Confirm the application type
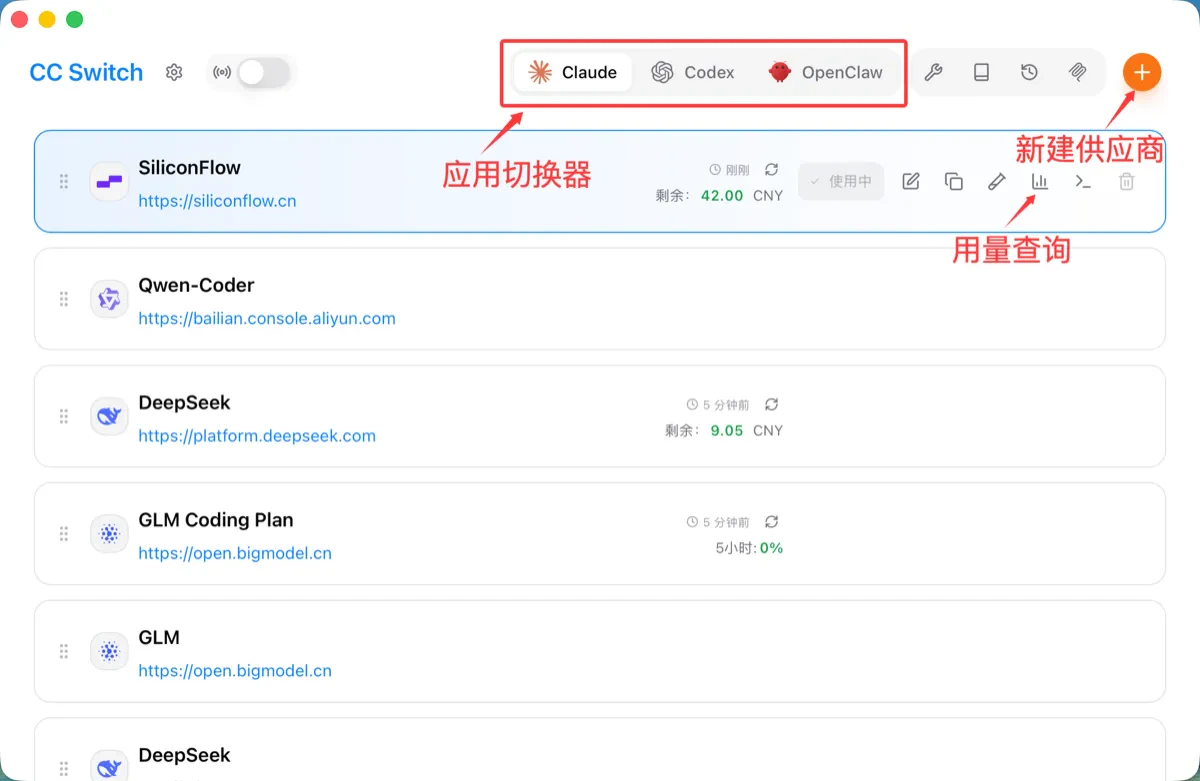
In the application switcher at the top, confirm that **Claude** is currently selected.
> **💡 Tip**: By registering through the link above and completing real-name verification, you can receive a 16 RMB reward, which can be used across models on the platform.
### 2.2 Add the SiliconFlow Provider (Claude Code)
Open CC Switch and follow the steps below to add the provider:
#### 2.2.1 Confirm the application type
In the application switcher at the top, confirm that **Claude** is currently selected.
 #### 2.2.2 Select the preset
Click the **+** button in the top-right corner to open the Add Provider panel. In the "Preset" dropdown, select **SiliconFlow** (purple icon).
#### 2.2.2 Select the preset
Click the **+** button in the top-right corner to open the Add Provider panel. In the "Preset" dropdown, select **SiliconFlow** (purple icon).
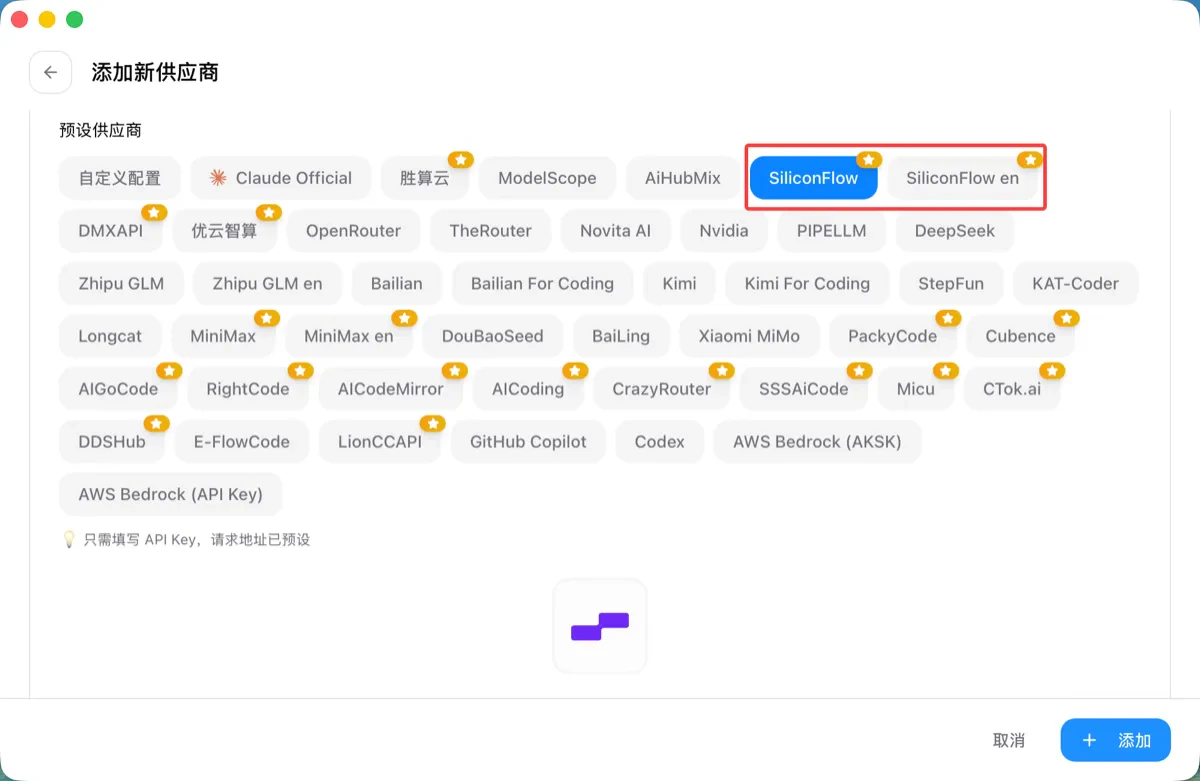 After selecting the preset, the following fields will be filled automatically:
* **Name**: SiliconFlow
* **Endpoint URL**: `https://api.siliconflow.cn`
* **Model**: `Pro/moonshotai/Kimi-K2.5` (all model slots are mapped uniformly)
#### 2.2.3 Fill in the API Key
Paste the key obtained in the previous step into the **API Key** field, then click "Add".
After selecting the preset, the following fields will be filled automatically:
* **Name**: SiliconFlow
* **Endpoint URL**: `https://api.siliconflow.cn`
* **Model**: `Pro/moonshotai/Kimi-K2.5` (all model slots are mapped uniformly)
#### 2.2.3 Fill in the API Key
Paste the key obtained in the previous step into the **API Key** field, then click "Add".
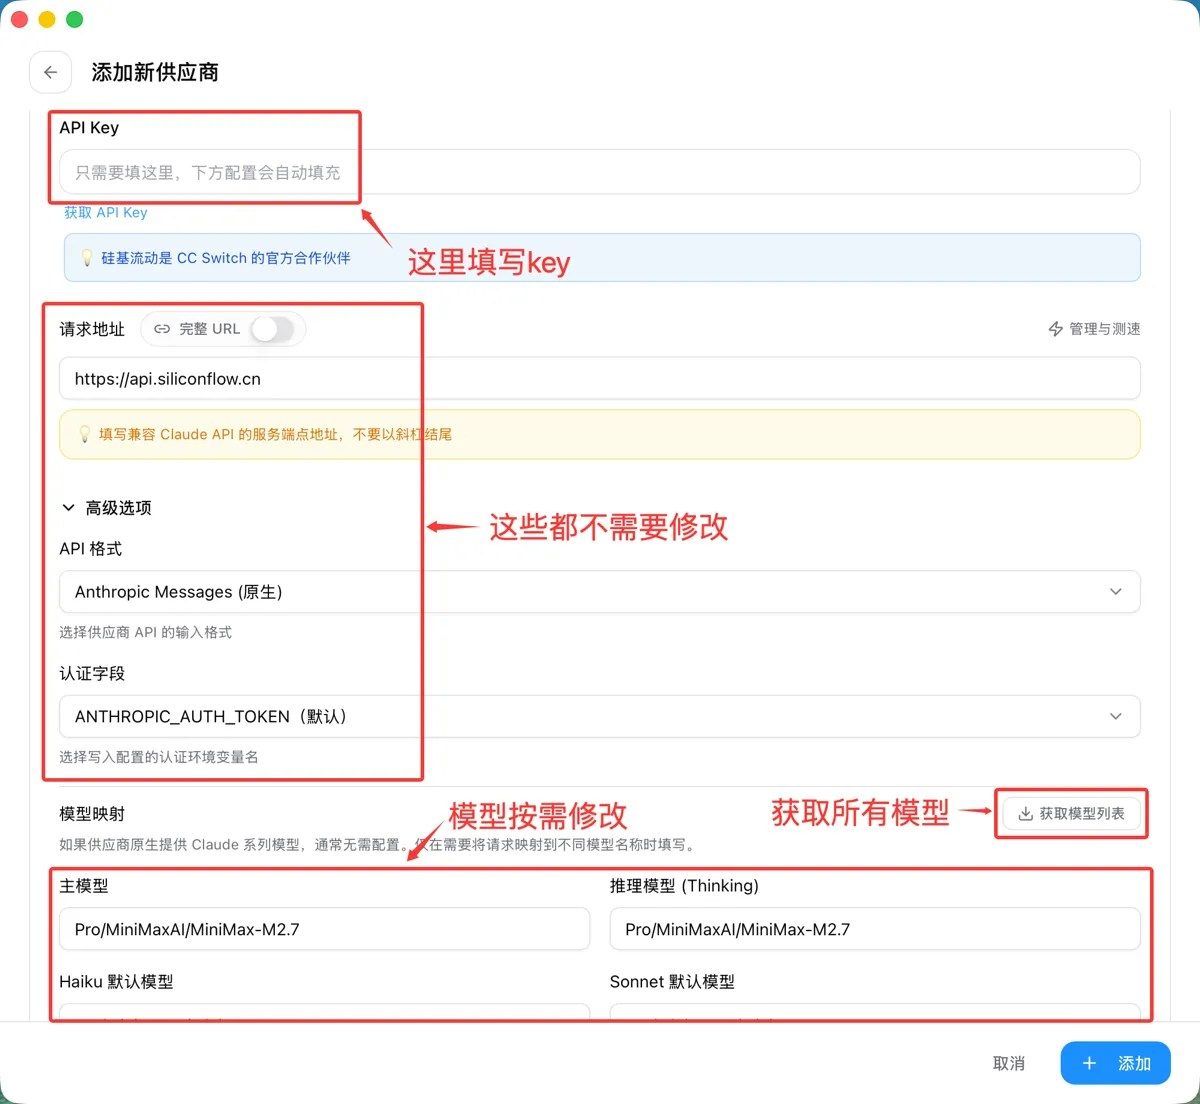 > **💡 Tip**: The SiliconFlow preset automatically maps all Claude Code model slots (haiku / sonnet / opus) to the same model. After adding it, you can still edit the provider and assign different SiliconFlow models to different slots.
### 2.3 Enable and Verify
#### 2.3.1 Enable the provider
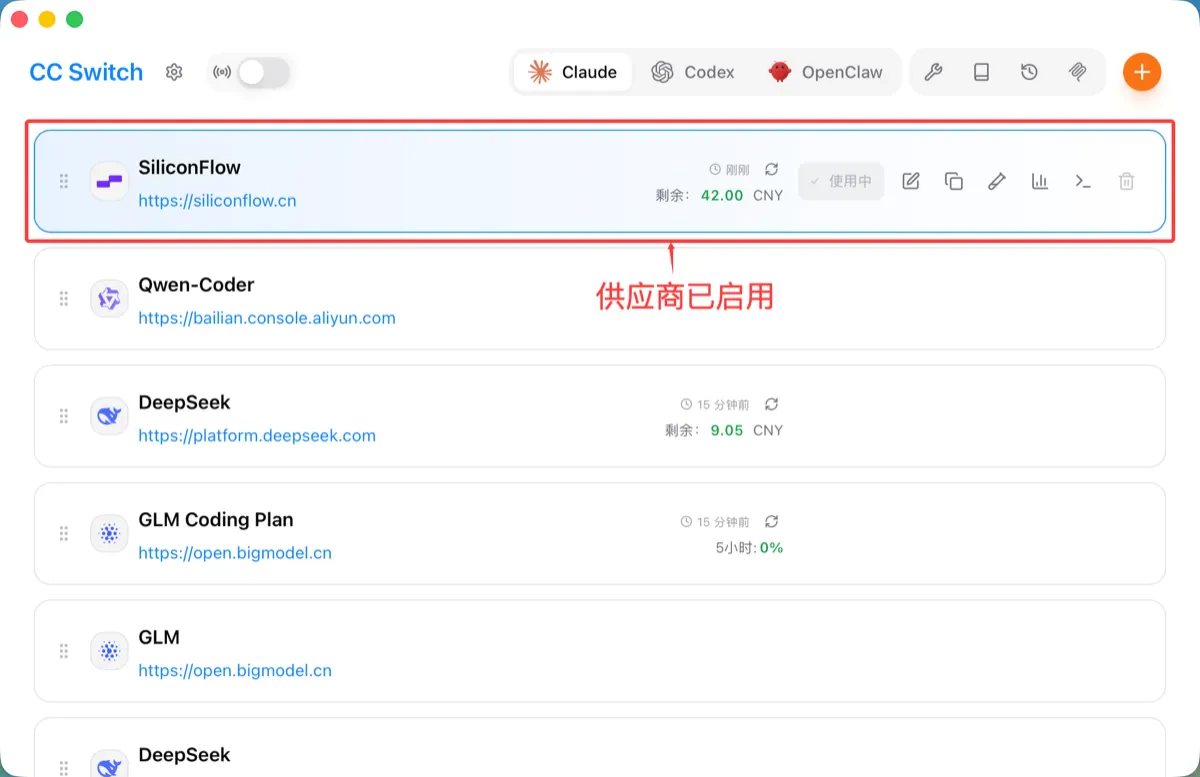
After the provider is added, the SiliconFlow provider card will appear in the main interface list. Click the "Enable" button on the card. The card will then display a blue border and a "Currently Enabled" label.
> **💡 Tip**: The SiliconFlow preset automatically maps all Claude Code model slots (haiku / sonnet / opus) to the same model. After adding it, you can still edit the provider and assign different SiliconFlow models to different slots.
### 2.3 Enable and Verify
#### 2.3.1 Enable the provider
After the provider is added, the SiliconFlow provider card will appear in the main interface list. Click the "Enable" button on the card. The card will then display a blue border and a "Currently Enabled" label.
 #### 2.3.2 Verify the configuration
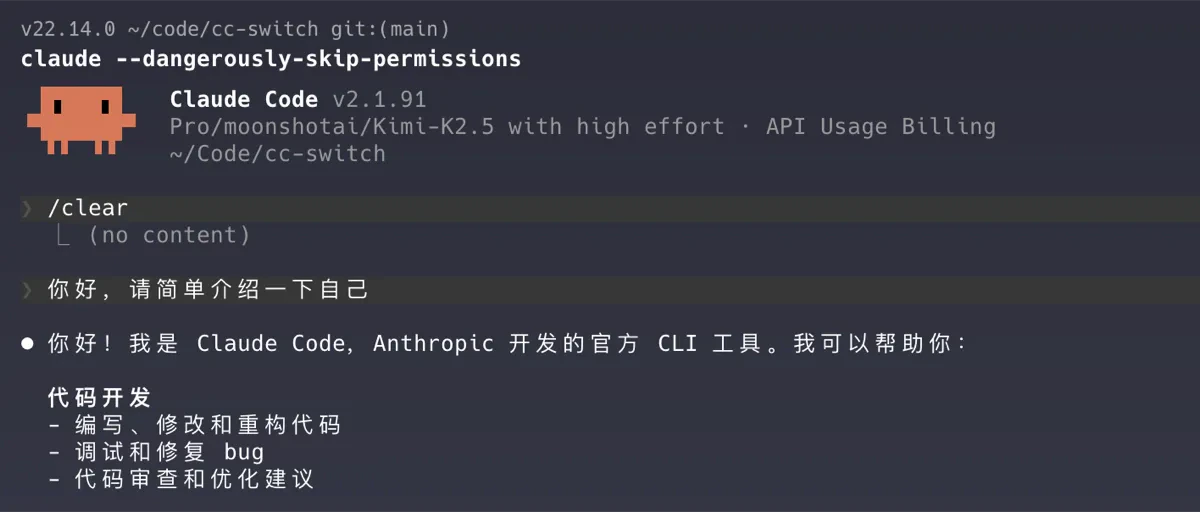
Claude Code supports hot reload, so after switching providers, **there is no need to restart the terminal**. The configuration takes effect immediately.
Open the terminal, run `claude`, and enter a test prompt:
```bash theme={null}
claude
> Hello, please briefly introduce yourself
```
If the AI responds normally, the configuration is successful.
#### 2.3.2 Verify the configuration
Claude Code supports hot reload, so after switching providers, **there is no need to restart the terminal**. The configuration takes effect immediately.
Open the terminal, run `claude`, and enter a test prompt:
```bash theme={null}
claude
> Hello, please briefly introduce yourself
```
If the AI responds normally, the configuration is successful.
 > **📌 Note**: If Claude Code prompts you to log in or shows the initialization guide on first launch, open "Settings → General" in CC Switch, enable the "Skip Claude Code initial installation confirmation" option, and then restart Claude Code.
### 2.4 Configure SiliconFlow for OpenClaw
SiliconFlow also supports OpenClaw. The same API Key can be used for both applications, and the CC Switch preset automatically handles the API format differences (Claude Code uses the Anthropic Messages format, while OpenClaw uses the OpenAI Completions format).
1. Switch to **OpenClaw** in the application switcher at the top
2. Click the **+** button and select **SiliconFlow** from the presets
3. Paste in the same API Key (the endpoint will be filled automatically as `https://api.siliconflow.cn/v1`)
4. Click "Add" and enable it
> **💡 Tip**: If you are also using an overseas network, SiliconFlow provides an international endpoint as well. Select **SiliconFlow en** in the preset list, with the endpoint `https://api.siliconflow.com/v1`.
## 3. Advanced Features
After completing the basic configuration, CC Switch has more features worth exploring.
### Quick switching from the system tray
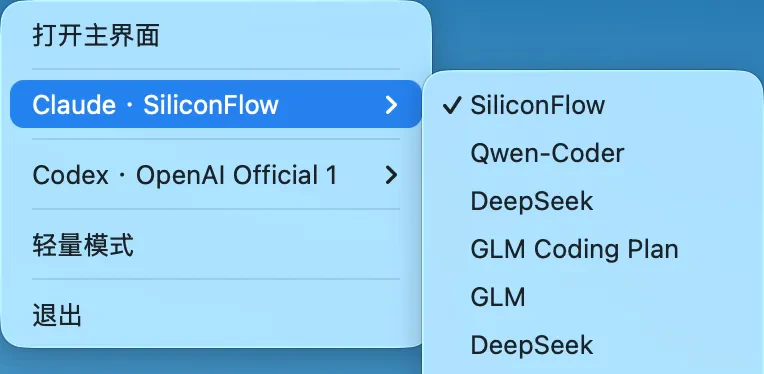
Click the CC Switch icon in the system tray to switch providers directly from the menu. The menu is grouped by application (Claude / Codex / Gemini), so you can switch without opening the main interface.
This is very practical in daily development—for example, quickly switching between SiliconFlow and other providers only takes two clicks.
> **📌 Note**: If Claude Code prompts you to log in or shows the initialization guide on first launch, open "Settings → General" in CC Switch, enable the "Skip Claude Code initial installation confirmation" option, and then restart Claude Code.
### 2.4 Configure SiliconFlow for OpenClaw
SiliconFlow also supports OpenClaw. The same API Key can be used for both applications, and the CC Switch preset automatically handles the API format differences (Claude Code uses the Anthropic Messages format, while OpenClaw uses the OpenAI Completions format).
1. Switch to **OpenClaw** in the application switcher at the top
2. Click the **+** button and select **SiliconFlow** from the presets
3. Paste in the same API Key (the endpoint will be filled automatically as `https://api.siliconflow.cn/v1`)
4. Click "Add" and enable it
> **💡 Tip**: If you are also using an overseas network, SiliconFlow provides an international endpoint as well. Select **SiliconFlow en** in the preset list, with the endpoint `https://api.siliconflow.com/v1`.
## 3. Advanced Features
After completing the basic configuration, CC Switch has more features worth exploring.
### Quick switching from the system tray
Click the CC Switch icon in the system tray to switch providers directly from the menu. The menu is grouped by application (Claude / Codex / Gemini), so you can switch without opening the main interface.
This is very practical in daily development—for example, quickly switching between SiliconFlow and other providers only takes two clicks.
 ### Unified MCP server management
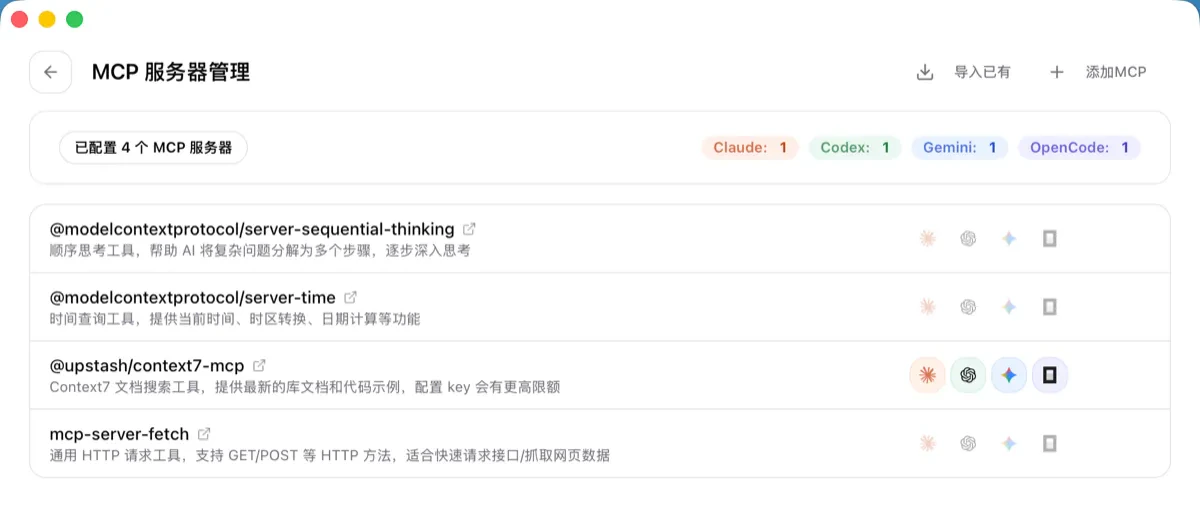
CC Switch can centrally manage MCP (Model Context Protocol) server configurations across multiple applications. Click the **MCP** button in the top navigation bar to enter the management panel.
* Use built-in preset templates to add common MCP servers with one click (such as fetch, context7, sequential-thinking, etc.)
* Independently control whether each server is enabled in Claude Code / Codex / Gemini / OpenCode
* Edit once and automatically sync to the configuration files of all enabled applications
### Unified MCP server management
CC Switch can centrally manage MCP (Model Context Protocol) server configurations across multiple applications. Click the **MCP** button in the top navigation bar to enter the management panel.
* Use built-in preset templates to add common MCP servers with one click (such as fetch, context7, sequential-thinking, etc.)
* Independently control whether each server is enabled in Claude Code / Codex / Gemini / OpenCode
* Edit once and automatically sync to the configuration files of all enabled applications
 ### Usage statistics and cost monitoring
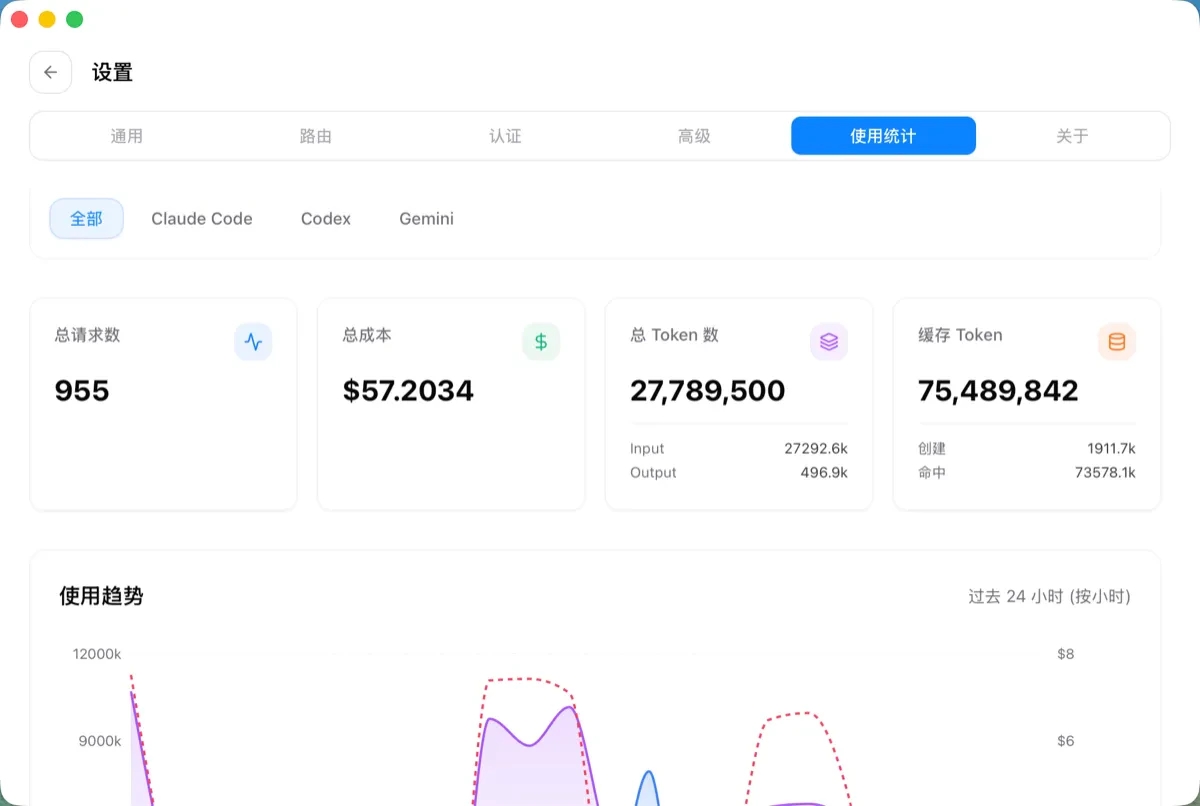
After enabling CC Switch’s local proxy feature, you can track the token consumption and cost of each API request.
* Trend charts show daily/weekly API spending
* Statistics categorized by provider and model
* Detailed request logs, including time, model, token count, and cost
This is very helpful for reasonably controlling API consumption from providers such as SiliconFlow.
### Usage statistics and cost monitoring
After enabling CC Switch’s local proxy feature, you can track the token consumption and cost of each API request.
* Trend charts show daily/weekly API spending
* Statistics categorized by provider and model
* Detailed request logs, including time, model, token count, and cost
This is very helpful for reasonably controlling API consumption from providers such as SiliconFlow.
 ### More features
* **Local proxy + failover** — Configure a failover queue for multiple providers (for example, SiliconFlow as primary and others as backup), and automatically switch in seconds when the primary provider fails
* **Prompt management** — Create system prompts in the Markdown editor and sync them to CLAUDE.md / AGENTS.md / GEMINI.md with one click
* **Skill management** — Browse GitHub repositories to discover and install skill extensions, enhancing AI capabilities
* **Session management** — Browse and search conversation history across 5 applications
* **Cloud sync** — Sync all configurations across multiple devices via WebDAV
* **Deep link import** — Import providers, MCP, prompts, and other configurations with one click through `ccswitch://` URLs
For more detailed tutorials, please refer to the [CC Switch User Manual](https://github.com/farion1231/cc-switch/tree/main/docs/user-manual/zh).
## 4. Related Links
| Resource | Link |
| --------------------------- | ---------------------------------------------------------------------------------------------- |
| CC Switch Download | [GitHub Releases](https://github.com/farion1231/cc-switch/releases) |
| CC Switch Source Repository | [github.com/farion1231/cc-switch](https://github.com/farion1231/cc-switch) |
| CC Switch User Manual | [Chinese Documentation](https://github.com/farion1231/cc-switch/tree/main/docs/user-manual/zh) |
| SiliconFlow Registration | [cloud.siliconflow.cn](https://cloud.siliconflow.cn/i/drGuwc9k) |
| SiliconFlow API Key | [API Key Management](https://cloud.siliconflow.cn/account/ak) |
>
### More features
* **Local proxy + failover** — Configure a failover queue for multiple providers (for example, SiliconFlow as primary and others as backup), and automatically switch in seconds when the primary provider fails
* **Prompt management** — Create system prompts in the Markdown editor and sync them to CLAUDE.md / AGENTS.md / GEMINI.md with one click
* **Skill management** — Browse GitHub repositories to discover and install skill extensions, enhancing AI capabilities
* **Session management** — Browse and search conversation history across 5 applications
* **Cloud sync** — Sync all configurations across multiple devices via WebDAV
* **Deep link import** — Import providers, MCP, prompts, and other configurations with one click through `ccswitch://` URLs
For more detailed tutorials, please refer to the [CC Switch User Manual](https://github.com/farion1231/cc-switch/tree/main/docs/user-manual/zh).
## 4. Related Links
| Resource | Link |
| --------------------------- | ---------------------------------------------------------------------------------------------- |
| CC Switch Download | [GitHub Releases](https://github.com/farion1231/cc-switch/releases) |
| CC Switch Source Repository | [github.com/farion1231/cc-switch](https://github.com/farion1231/cc-switch) |
| CC Switch User Manual | [Chinese Documentation](https://github.com/farion1231/cc-switch/tree/main/docs/user-manual/zh) |
| SiliconFlow Registration | [cloud.siliconflow.cn](https://cloud.siliconflow.cn/i/drGuwc9k) |
| SiliconFlow API Key | [API Key Management](https://cloud.siliconflow.cn/account/ak) |
>